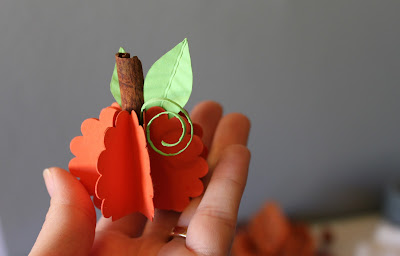
It's such a cute little guy in its classic colors of orange and green. This year, I decided to add in a little sparkle and mix up the colors.
In order to make your own lil' pumpkins, read the instructions below.
What You Need
- Cardstock paper in the color of your choice
- Scalloped 1 3/4" punch (OR - use a plain circle punch - OR - draw your own circles using a stencil or jar lid)
- Cinnamon sticks (OR - use a small branch or chenille sticks)
- Glue
- Scissors
 |
| I used a 1 3/4" scalloped punch. |
 |
| Fold each circle in half, right-side to the inside. |
 |
| Once all the circles are glued together, flatten and snip the bottom edge. |
- Punch 8 scalloped circles out of your cardstock (a 6" square is big enough for all 8 1 3/4" circles.)
- Fold each circle in half with the decorative side on the inside. If using the scalloped punch, make sure you fold in such a way that your rounded edges line up and there are no pointed edges. (See above)
- Glue the folded-in-half circles together, one at a time until all eight are glued in a stack. Let the glue dry for a few moments.
- Glue the last two circles together, completing the round pumpkin shape.
- Flatten the circles and snip off one edge so that your pumpkin will sit flat. (See above)
- Open back up and gently push a piece of a cinnamon stick in the center of the the pumpkin for the stem.
- For leaves, you can punch them out with a leaf punch or simply cut a lead shape out like I did. If going for the classic look, use green for the leaves. Otherwise, mix and match for the look you want. Place a dot of glue on the back of the leaf and place it just inside the pumpkin.
- Extras: I decorated the shimmery orange pumpkin with two amethyst-colored glass beads, tied on to thin beading cord. For the plum pumpkin, I cut leaves in each of the three colors I was working with and attached them to each other with a little brad (an eyelet would also work.) I gently pushed the open bracket into the cinnamon stick. For a curly vine, just cut a thin and long piece of cardstock, twirl it around your finger and glue just inside the pumpkin.
- A few ideas for decorating: place your lil' pumpkin(s) in a decorative dish, on your mantle or tucked in and around picture frames. They also make great place card holders for a lovely Fall dinner. Enjoy!


No comments:
Post a Comment